Photoediting and
Photo Restoration Services

At Graphic Fusion, I try to make a wide variety of services available for all of your your photoediting needs. Among other things, I am a very experienced graphic editor who can work the necessary magic to turn ordinary photographs into something quite presentable, if not framable. Similarly, I am skilled at restoring torn, scratched, spotted, and faded family photos. In fact photoediting is my specialty. I have done extensive work with computer-aided graphic editing since since 1996, mostly in the capacity of web authoring, then in amateur photography, and finally as a professional photographer. Prior to that, my image experimentation dates back to my early teen years, when I would superimpose images in the darkroom, work with burning and dodging techniques, experiment with image distortions in radically modified cameras, and combine hand editing with contact proofing techniques to create dense "fog blankets."

Unlike too many graphic professionals today, I have a keen awareness of an image's "information" content and have developed a workflow that maximally preserves information. Editing sessions are substantially pre-planned with a minimum of strategically ordered steps. The result is sharper images with greater detail, less noise, cleaner edges, and smoother color transitions.

What can be accomplished with an image? Just about anything, so long as it has enough information. "Anything" includes color correction, brightness level correction, cropping, resizing, retouching, deletion of items/features, addition or substitution of items/features, change of position of items/features, perspective corrections, correction for some lens defects, some degree of compression artifact reduction and digital noise reduction, multitudes of special effects, addition of lines and text, soft focusing, diffusion, and many, many more things. Although some of these manipulations are easy for amateurs to do a reasonably well (but usually not optimally), many are very technical and require an intimate understanding of editing software, as well as extensive experience in image editing. This sort of understanding often comes from direct communications with the software programmers, extending well beyond the level of information provided in the user manuals. With images of reasonable quality, Graphic Fusion can perform radical manipulations that look realistic, not stiched together.

Shown below are some of the examples of image editing that I perform everyday. Please examine them to see what I can do for your graphic images. If you like what you see, please contact me to discuss your graphic editing needs. I think you will find my rates to be competitive and my work to be of a high caliber.

Sarah Fox,
Graphic Fusion


"Gods of the Harvest" is an excellent example of colorization and background substitution. The objective of the image was to be a somewhat surrealistic parady of the stone gods of Easter Island, at least as they are commonly portrayed. This required saturated colors, clear blue skies, and no trees (which were cut down on Easter Island). The image was separated into three layers: the hay bales, the grassy field, and a stock sky shot taken in another location. The hay layer was colorized, and then carefully feathered and cloned to eliminate the choppy appearance of most cut jobs. Grass blades were added individually to the grass layer to overlap the bases of the bales, and the horizon line was softened for realism. These are the results. Note the high magnification detail shot, which shows the success of the blending methods.

Before... After...


"Ostrich With an Attitude" was a lower resolution shot taken with an older digital. In the original photo, the fence was tilted and needed correction. A skew was performed to bring the fence in line. This presented problems with hatching artifacts in the vertical lines. To remedy this, the original image was rotated by a similar amount, and the individual fence posts were overlaid, feathered, and blended. The original intent was to create yet another layer for the ostrich, which would be kept with its neck outstretched, but by a happy accident, the skew correction resulted in a contemptuous glare from our bird friend. I kept it. Hatching in the hairs and beak features required hand retouching. In the hi magnification detail, note the smoothness of the fence post. The objective is for it to look real, which it does, even through the fuzz on the ostrich's neck.

Before... After...


"Pink Parasols" was captured opportunistically with a disposable camera (the only camera within grabbing range at the time). It was not possible to get closer to the subjects without disturbing them, and of course a disposable camera has no zoom. This was what I got with one shot, the only shot I had time to click off before the girls left. By the time I cropped it down to where it needed to be, the resolution was low, and the grain was huge. To rescue the image, I did an "oil paint" transformation to mimic an impressionist painting, which of course would be appropriate to the subject. It was necessary to move the smaller waves into the crop area and to straighten the horizon. More seriously, it was necessary to hand-retouch the red and blue halos from the lens' terrible chromatic aberration. The result is a very charming 13 megapixel photograph that looks fabulous in any print size.

Before... After...


"Potter's Cat" is a photo I took of a cat that was so affectionate that I literally couldn't keep him within focusing distance from the camera. The shot on the left was hastily snapped during one of those fleeting moments the cat was not rubbing up against my leg. In the background, note the boxes of Friskies cat food. This photograph required rotation, perspective correction, and finally the alteration of the cat food boxes to be something else -- clay spattered boxes of some sort. Not as obvious in this photo, the different color channels in the photograph were manipulated separately prior to gray-scaling to accentuate the clay spatters. Without this step, the fascinating texture from the spatters would not be as prominent in the photo.

Before... After...


"Sleeping Child" was taken in an airport during a layover. The child was precious, but for obvious reasons, he had to be photographed exactly where he was -- on a ripped up seat, just the other side of a band of goth kids I jokingly refer to as the Charles Manson gang. All that had to be fixed to make the picture less junky and to avoid detracting from the subject. Removing the exposed diaper was a hard call. In the end, I decided that it was too much of a distraction. Although removing the diaper was easy, it would have looked strange not to see the edge of the pants on the other side, a detail that many people would not have created.

Before... After...


"Stroll in the Snow" was another difficult photograph. I saw these two strolling down the street in front of this historic building just a little bit too late. By the time I could get into position for the photograph, these two had walked too far down the street for proper composition of the photograph. I took the photo anyway, knowing that I could correct the problem later. This is a classic example of rearranging a photo. To achieve this, I had to selectively copy the people, rescale them appropriately according to calculations made on the photograph (high school trigonometry!), paste them into the correct positions, again assisted by mathematical computations to preserve proper scale, and then clone over the original figures with snow. Those were the easy manipulations. Surprisingly, the most difficult manipulation in a snow scene is adjusting the brightness curve to keep the image "blustery" but still maintain brightness.

Before... After...


"Carolina Girl" was taken during a heavy snowfall. The exposure obviously wasn't optimal, but I had to shoot very quickly, because my lens was getting wet. Once the color and contrast corrections had been made, I had a very boring photograph, because the sky was washed out. I couldn't manipulate the contrast curve to bring out any drama in the sky, because too much of the foreground was the same lightness as the sky. To solve this problem, I created two versions of the photo. In one, the foreground was virtually black, but the sky had drama. In the other, the foreground looked right, but the sky was white. Then I loaded the images into two layers and meticulously blended the foreground layer to remove background light halos. The drama still wasn't what I wanted, so I created an intermediary layer of driving rain/snow, with each flake hand cloned in random positions and in an assortment of sizes. Then I motion blurred to create a driving motion and blended with the appropriate opacity. The result is a very dramatic image of what was once a rather peaceful (and boring) scene. Note the natural appearance of the cut lines in the detail image.

Before... After...


"Two Friends" was carefully shot, with plenty of time to plan the exposure. The challenge of the picture was to sort out foreground from background, particularly to emphasize the little tree, which is a very important part of the picture. Because of the black and white nature of the building, I wanted the photo to be in black and white, which made the task all the more difficult. A simple gray scaling would have been devoid of important details. To separate out all of these elements, I carefully studied the information in the photograph, finally concluding that I could not satisfactorily achieve my objectives with individual alteration of color channel contrast curves. Rather than work with RGB channels, I then studied hue, saturation and lightness. Lightness was useless in this case. Saturation information would not distintuish the roof from background foliage. Ultimately I derived my image from a hue map, which distinguished beautifully between red and green tones, with the added benefit of exaggerating the contrast of the white surfaces (provided I did the right amount of hue shift prior to taking the hue map) and minimizing the contrast of the background foliage (which would otherwise be a distraction). When I did this, unfortunately, the foliage from the tree was not well distinguished from the roof, nor was there adequate contrast in the trunk. I remedied this by doing some radical color curve transformations that emphasized (whitened) the foliage, while darkening the trunk and branches. Then I overlaid this image over the hue mapped image, carefully blending and feathering the features. The easy parts of this photograph were the removal of the ladder at the base of the tree and the removal of the hanging gutter.

Before... After...


"Waterfall Fantasy" is a composite of two photographs from the same area. I was careful with both shots to take very long exposures (1/4s and 1/10s) to get a nice motion blur in the water. This was possible with a steady hand and image stabilization capabilities. (I didn't carry a tripod on the hike.) Both of the original photographs are pretty and have potential, but neither one is a "great" photo by itself. The primary weakness of the photo with the foot bridge is that it was too late in the season, and the trees had lost their leaves, leaving a bright white sky in the background. Clearly the background had to be substituted, but with what? The answer quickly became obvious -- with the other waterfall that had its own problems (including blown out highlight on the water and inadequate detail in the shadow regions). I adjusted the colors and contrast of both photographs to resemble each other, and I kept the blown out highlight in the upper waterfall to emphasize the sunlight at the upper level and give depth to the photograph.

Before... After...


Quail at Sunset is another example of a composite photograph. The two images on the left were taken within a half hour span of each other on the same mountaintop, but they had to be combined together to create the perfect perspective. That's because as sweet as these little birds are, they aren't cooperative enough to stand on their designated mark, on cue, within precisely the 10 or 15 second time window when you're ready to shoot. This sort of image can be created relatively easily from two shots but would be almost impossible to find in a single shot. Of course combining two images requires much more than simply sticking them together. A lot of tedious mouse work is required to isolate the elements of the photograph, to separate them into different layers, and then to blend the edges for a natural look. In this photo, I had to hand-paint all of the tiny feathers that were ruffling in the breeze.

Before... After...


Sedona Mountains 1 is an example of a pre-planned, uniquely digital photoediting solution to an extremely difficult shooting situation. The challenge: I'm in the desert without a tripod. Why? Too much bulk to bring on the plane. It's sunset, and the light is very dim. It's even dimmer in the foreground, which is being shadowed by a mountain to the left rear. I need 1/30 sec or faster to shoot handheld, and I need f/8 or smaller for the required depth of field. Shooting at a higher ASA wouldn't help, as light can't be created. At ASA 1600, for instance, the camera would count every photon as 16 photos. That would only achieve a better exposed image for the viewfinder, but the end product wouldn't be any better. This solution would only risk "blowing out" highlights. My decision was to shoot at ASA 100, approximately 2.5 stops underexposed, and then to make the necessary adjustments during photoediting. The unedited image is shown on the left top. After an initial luminance curve manipulation, with a mild gamma applied, I got the image in the middle left. Obviously the shaded foreground lacked detail, which I expected would happen. It was then necessaty to disect the foreground from the image and to apply a steeper luminance curve, resulting in the image on the bottom left. Finally, I blended the bottom and middle images, using careful cloning and feathering over the edges to make them appear natural. The result is the image on the right. I won't claim that the image couldn't be obtained without digital methods; however, it would require a very elaborate flash setup, probably with at least 6 or 8 flashes judiciously placed around the foreground, with gels to warm their light and gobos to even out their light distribution. The shot simply wouldn't be worth that sort of heroic effort. I "got away with" a lot on this shot. I took the 12 bit color depth of my camera and "squeezed" it down to the critical 8 bits in the foreground, but that's all it took.

Before... After...


Not all of my images are generated from photographs. Some (very few) come straight from the computer. For instance, I designed this graphic to display while an image is loading, in part as an attention-getter. The image was created in numerous layers, so that the individual elements could be manipulated independently. It took approximately 90 min to create this image. I ultimately didn't use it

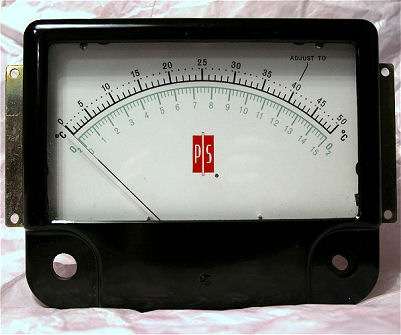
Some graphics are partially photographic and partially composed. For instance, the banner at the top of this page and the button panel at the top left were created by photographing a camera lens and one corner of a bakelite electrical meter. Then the images were chopped up, manipulated, mangled, and reassembled to form the final image. This was the image that started it all:


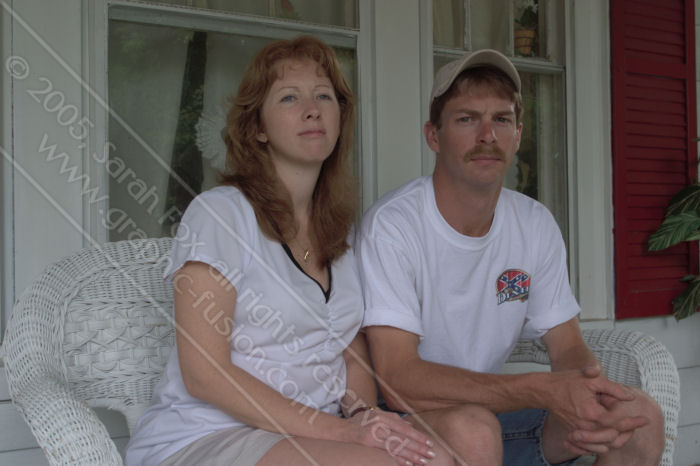
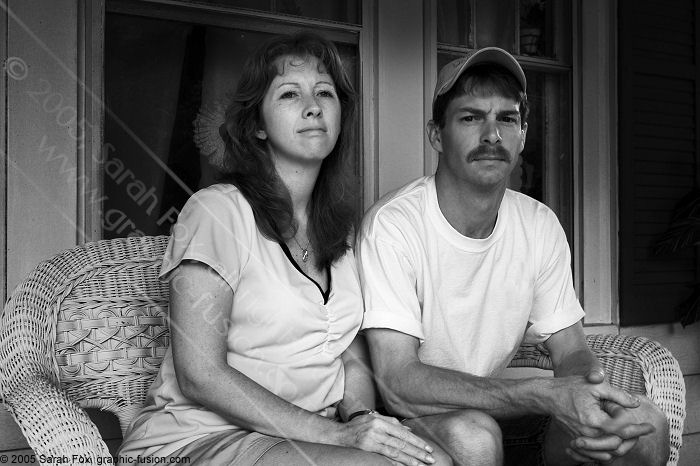
Examples of my work can be seen on the web. I did all of the photography, photoediting, and web authoring work for wonderfulhome.info, a web site used for selling a beautiful, up-scale home in Upper Arlington, Ohio. The brass plaque is an example of a radically modified image. It is actually a derivation of the home page photo of the house.

I also did the web authoring work for Farrell Piano of Tampa, Florida. The owner of the site took almost all of the pictures with his digital camera, and I did all of the photoediting work. Note that the web site is not yet completed, pending the owner's providing a couple of requested photos and some descriptive text.

Of course the best example of my web authoring and photographic/photoediting work is the Graphic Fusion web site itself. The site looks rather simple to the visitor, but its features are quite sophisticated, incorporating JavaScript to auto-generate most of the image pages, track referrals, allow customers to "try out" frame and mat colors before buying, and mediate exchange of information with PayPal. Behind the scenes, it is designed so that the change of a single number in an Excel spreadsheet will result in the creation of a new JavaScript catalog file, which will result in the corresponding changes on all image web pages. Still another JavaScript page generates an HTML catalog page for those visitors who are not JavaScript enabled.

I hope you enjoy visiting these web sites and browsing their contents. Please contact me to discuss how Graphic Fusion can meet your photography and photoediting needs.

Sarah Fox,
Graphic Fusion


Do you think your friends would like our artwork?
Effortlessly earn 10% referral fees either for yourself
or for a charity. Find out how.


Links: Home Galleries About Gift Certificates Photoediting Services Wedding Photography Building Photography Special Events FAQ Feedback Referral Partner Program Contact Site Map Notice: All images and web content are copyrighted by Sarah Fox, Earline Thomas, and/or Graphic Fusion, will all rights reserved.
Printing or distribution of this material is prohibited.